Wednesday 29 January 2014

Emerald Anniversary Pocket Watch.

Hello again, to day I thought I would share with you my Mum and Dads Anniversary Pocket Watch.  Once again the basic structure has already been covered in Pocket watch number three, and Steam Punk Floral Compass. The changes are the hinge and that I used white pearl card so that I could hand colour the out side of the pocket watch, using alcohol ink pens, these worked really well.
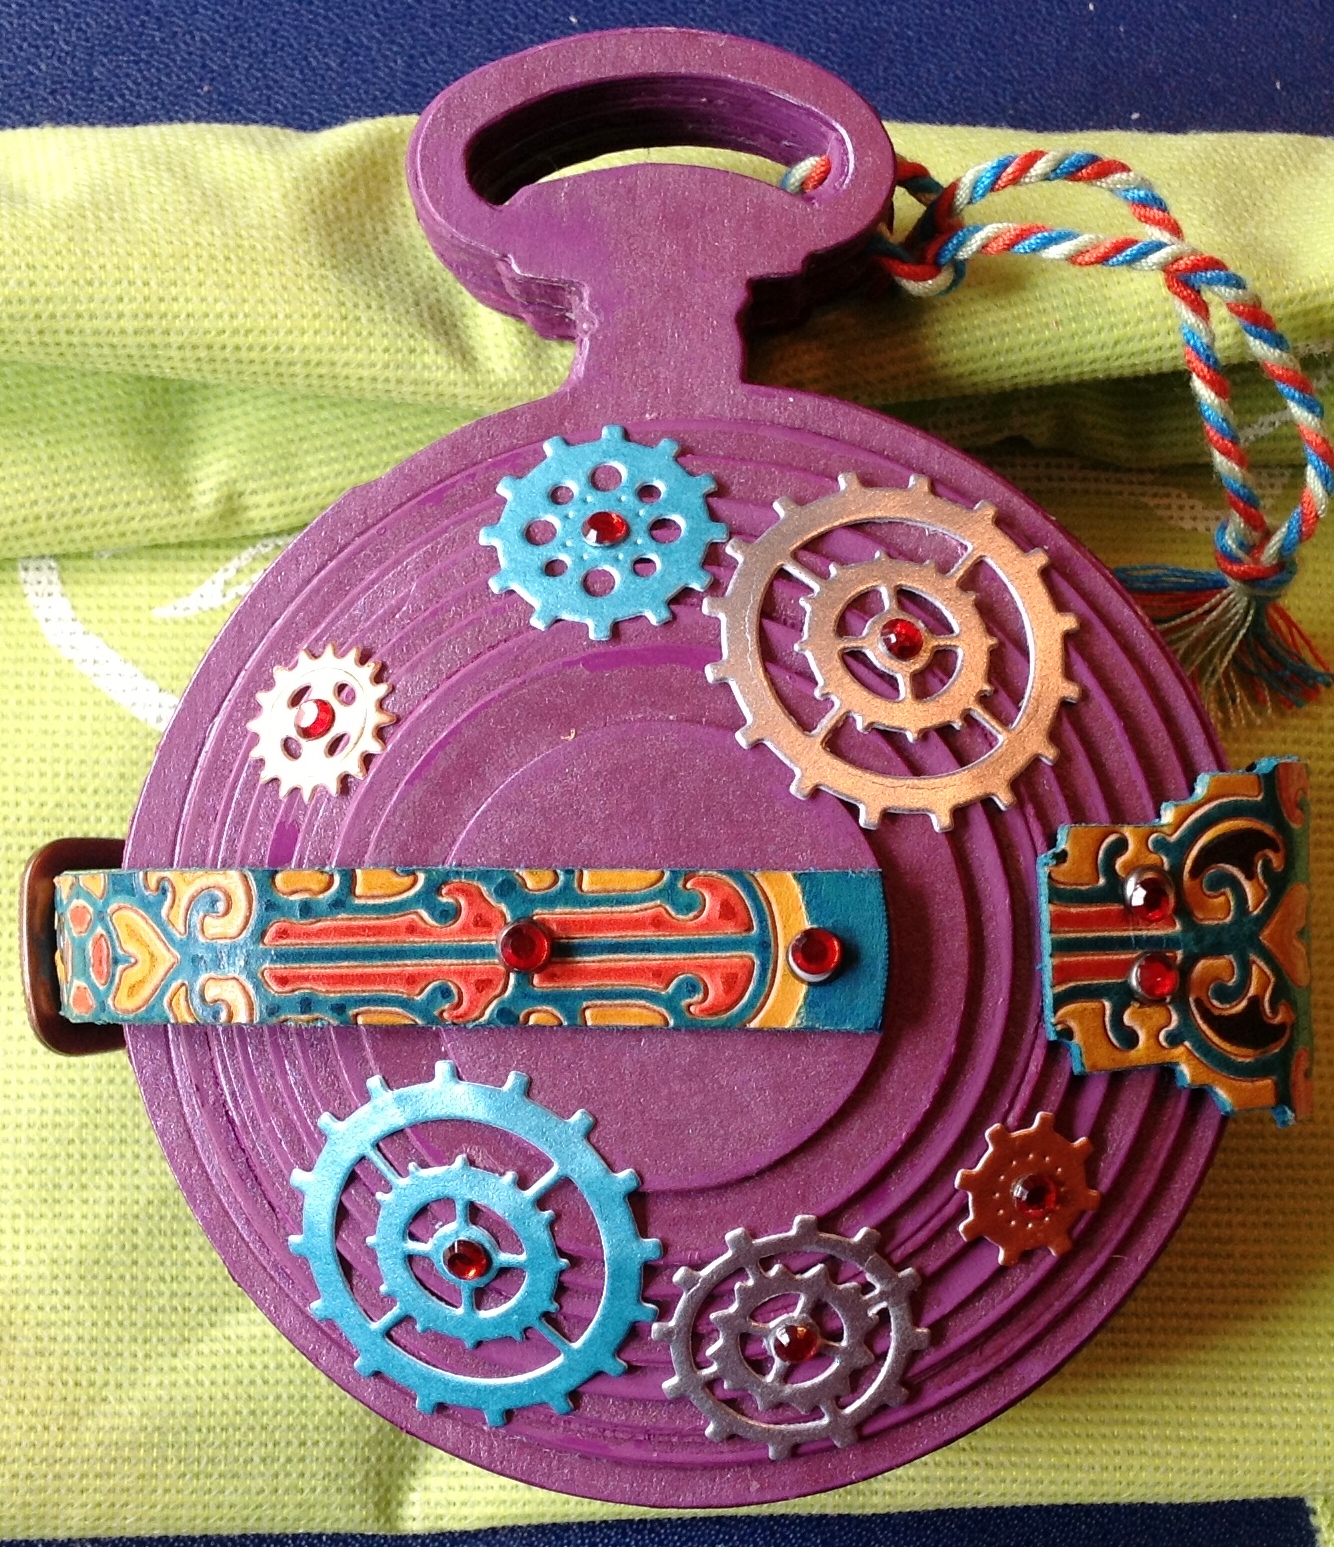
 Any way before I get carried away heres a look at the pocket watch.


Basic materials needed.

Art institute glitter and glue, both dries white and clear.
Leather, vegetable tanned.
Playing card stamps by Dark Room Door.
Spellbinders dies.
Emerald, gems,various sizes.
Sizzix pocket watch, circles dies,, labels movers and shapers thinlits dies.
Lifestyle crafts circles dies.
Memory box ,acorn.
Spellbinders, mini oak leaves and branches dies.
Die cutting machine that can cut both thick and thin dies.
Blue leather cord.
Grunge board.
White pearlized card..
Tim Holtz Distressed paint, Picket fence.
Alcohol ink pens..
Water colour paper.
Alcohol inks.
Clarity card.
Momento black ink.
Tim Holtz metalic film.
Pro marker pens.
Colell glue.
Tweezers.
Moulding mat and ball tool.
Memory box.
Vegetable tanned leather, for hinge and strap.
Fine scissors.
Metal edge ruler.
Roller cutter.
Tim Holtz long fasteners.

Here are the steps to make the Emerald Aniversary Pocket Watch.

 
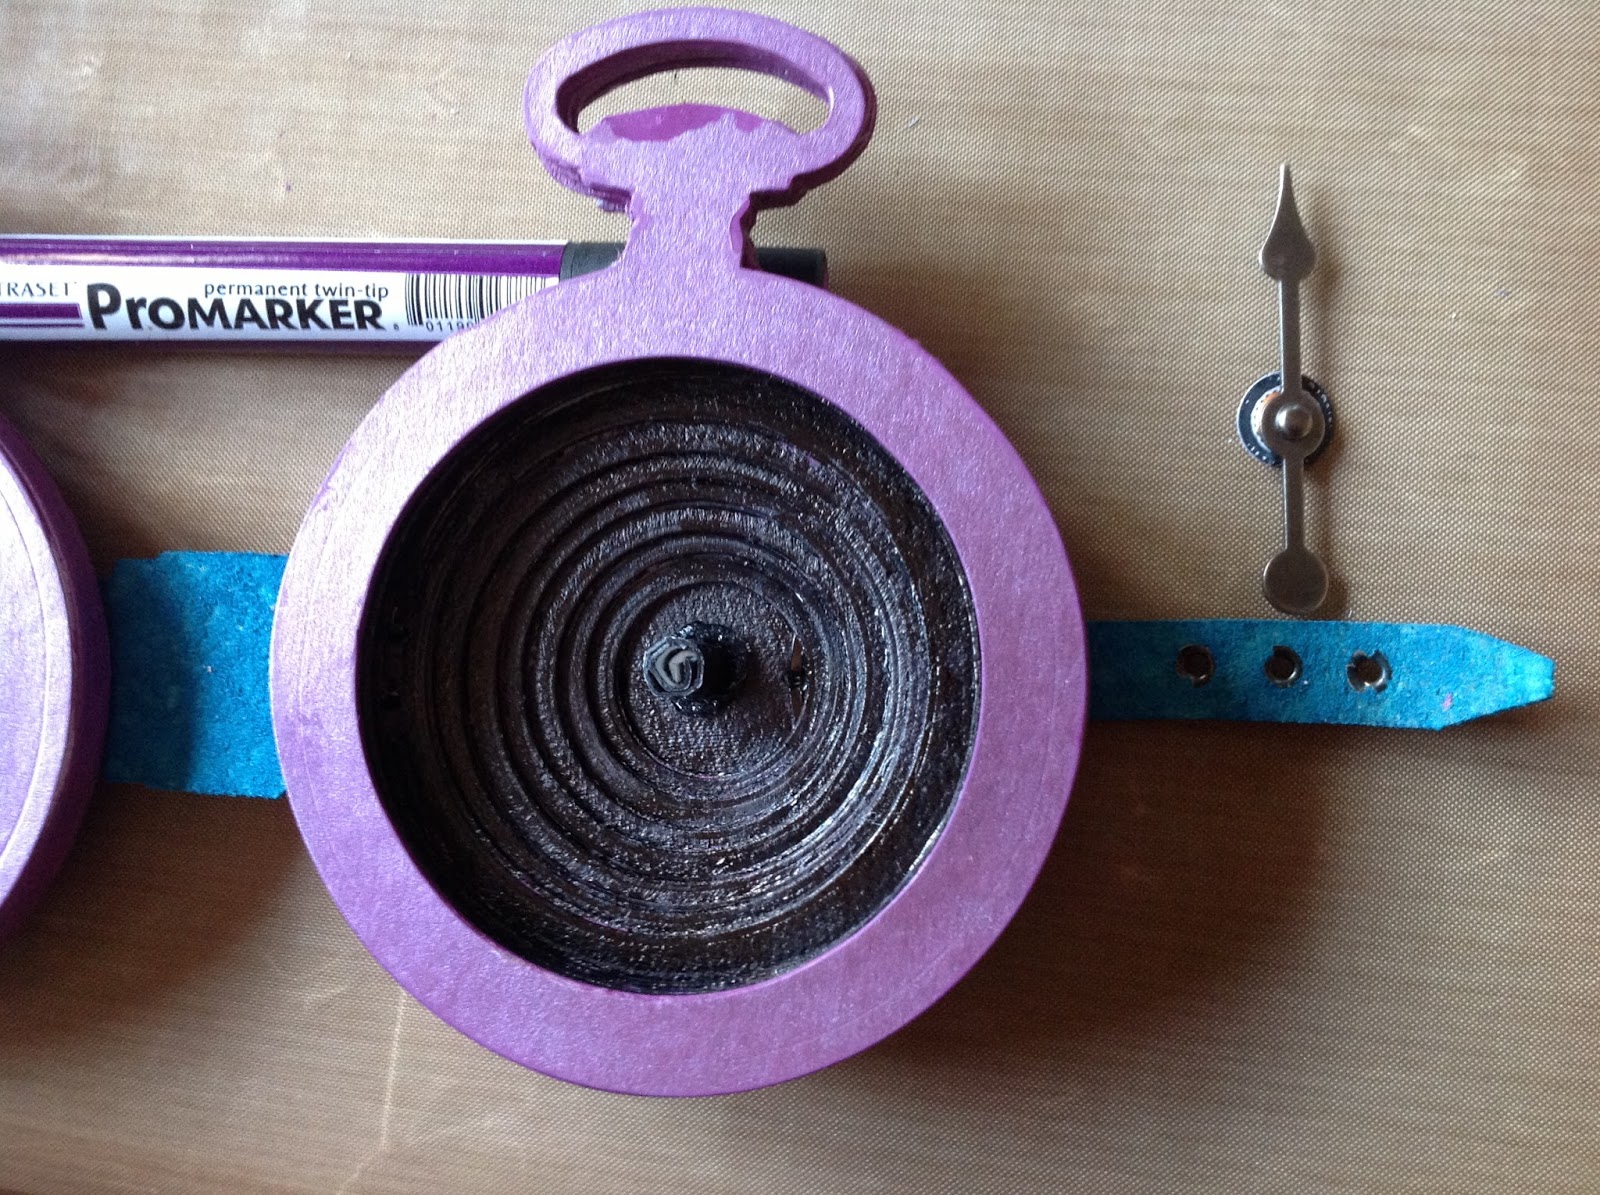
Cut out all the pieces of the pocket watch and the accompanying layers. Paint the edges white with distressed paint. Then cut the layers out in white pearlized card, and stick layers together remembering to punch the holes for the hinges.
 
 
Cut out hinge and strap, punch holes and run through your die cutting machine using  thin dies. This cuts and embosses just the surface of the vegetable tanned leather which prevents any ink or colour bleeding where you don t want it to go.
 
Cover the surface of the leather with a thin coat of white distressed paint and allow to dry thoroughly.


Colour  the design with alcohol pens, for a really glossy finish. Normally you would not put these together as the alcohol inks will remove the acrylic paint, but using a light hand and the distressed paint you can get some lovely results with glowing colours.


Attach strap and hinge, then the rest of the layers. Colour the surface of the watch with alcohol ink using pens or ink.


Then make the label using leather cut out with Sizzix bigz dies, then emboss using thin metal dies and decorate as above.


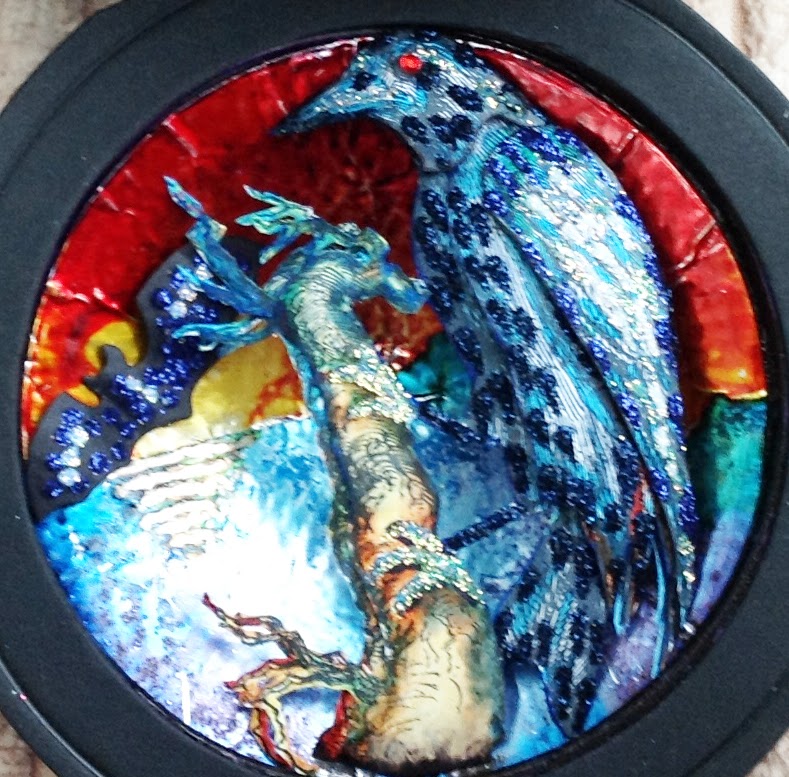
Stick the sticky backed foil to water colour card or other card that will hold its structure when molded to the inside of the watch. Colour using alcohol inks. Then cut two circles slightly larger than the pocket watch opening, cut a line to the centre, place some glue on the base before moulding into position.


Stamp the kings and queens six times each, cut out the layers wanted and colour. then layer and place inside the pocket watch.


Here are some pictures of the finished piece.


Pin It


Tuesday 15 October 2013

Time for Halloween. Spooky Hollows Pocket Watch

Hello, I love the Autumn or the Fall if you live on the other side of the pond, and so I decided to try a Spooky Hollows Pocket Watch for Halloween, and while its not celebrated in the UK with quiet so much enthusiasm as it is in USA or Canada I still think its fun to get involved even in a small way.
So first some pictures and then how it was created.


Tools and Materials used.
 
Grunge board.
Pearl purple card.
Black mount board with black core.
Large and small eyelets.
Vegetable tanned leather, purple leather and black soft leather.
Distressed paint, Picket fence.
Pro markers black, orange, red and tulip yellow various blues and skin tones.
Hole punch and eyelet setter.
Thin paint brush.
Metal edge ruler.
True cutter.
Fine scissors.
Felt blender for alcohol inks.
Alcohol blending solution and inks.
Metal foil.
Water colour paper.
Clarity card.
Memento black ink pad.
Waltzing Mouse stamps, Vintage Witch, and All Hallows Eve.
Art institute glitter, and their both dries white and dries clear glue.
Spellbinders dies, Witches brew, and bats.
Sizzix dies, Bigz pocket watch, circle dies, cat and raven, and labels movers and shapers.
Sizzix thinlit dies, Trick or Treat, Cross, Dove and Banner dies.
Lifestyle craft dies circles.
Gems various sizes, Emerald, AB, Black jet, and red.
Orange jewelry cord.
Black leather cord.
Collall glue.
Tweezers. 
Leather needle.
Tim Holtz buckle.
Die cutting machine for thick and thin dies.
Gilding wax, red and verdigris.
Cotton thread, orange, purple and black.
 
 
I will not go into great detail of how to make up the Pocket watch as this is covered in both Pocket Watch number three and Steam Punk floral compass my last two posts. {look in July link http://jacquioa.blogspot.co.uk/2013/07/pocket-watch-number-three.html and September http://jacquioa.blogspot.co.uk/2013/09/steam-punk-floral-compass.html}. However I will just say that the difference in depth is created not just by the number of layers but by the thickness of the materials used. In Pocket watch number three I used Grunge paper while in Steam Punk floral compass I used Grunge board which gives greater depth. In the Spooky Hollows Pocket watch I used Grunge board.
 
So here are a few pictures of the making up of the pocket watch.


Here you can see I started with the hinges, by cutting out several Sizzix labels in vegetable tanned leather and then choosing different sizzix and Memory Box dies to emboss them with. I choose sizzix Trick or Treat thinlits die in the end. All I needed to do was place the thin die where I wanted on the label and stick it in place and then run it though my die cutter. This embosses and cuts just the surface of the leather which can then be coloured in using Pro markers and distressed paint. For the strap I used the cross from the Sizzix Cross, Dove and banner dies. I used pro marker black and Distressed paint Picket fence, which I painted on with a fine brush. The paint is very inky and goes onto the leather well, and even  when the strap has been opened many times does not rub off when dry.

Next I stuck four of the layers together before adding holes for the hinge and strap. Then build up the rest of the layers to form the pocket watch, then begin to decorate.

The first thing I did was to make a witches hat to sit on top of the watch, I made a pattern in paper first using the largest circle in the Spellbinders Grand circles for the top of the hat and for the brim I used Lifestyle crafts circles.This is cut out of black leather glued in place and then stitched as I wanted the hat to be robust so it could be pulled off and put on the top of the watch many times without coming apart.


Then I decorated with bats which were made out of purple leather, the leather already had a texture so I gently rubbed with gilding wax this gives a slightly iridescent sheen before stitching them on and adding a few AB gems. I wrapped round the orange jewelry cord, and stitched in place so the hat could be repeatedly put on the neck of the watch.


Next came the inside, I stuck some Ranger sticky foil on to some water colour paper before cutting out two circles slightly larger than the centre of the pocket watch, then I used alcohol inks to create a deep sunset scene just before dark. Once this had dried I cut two straight lines to the centre of each circle. This was done so I could get the most depth out of the pocket watch.


I stamped both the witch and the raven from Waltzing mouse stamps All Hallows Eve and Vintage Witch sets four times. One for practise and colour try outs the other three to cut into sections to be coloured glittered and layered for depth. Once all the decoration had dried including the glitter I used a moulding mat and ball tool to shape each piece before glueing them in place.
 
Next was the decoration of the outside. For the front of the watch I wanted spiders so I used Lifestyle crafts spider die which I then glittered and Jewelled these then shaped them using the moulding mat. I then glued on the memory box delicate web cut out, placed the spiders and added some jewels.


Next I cutout the Sizzix cat and the Spellbinders bat and boots, decorated with gems and glitter, then shaped them as before and glued them on.

Just a note look at what I found when I'd finished  crafting!! The great penguin massacre!, the penguin in question Skys favourite toy up to date!! He must have looked at her funny! Sky is my 11 month old Bishon who really  lives up to Naughty but cute tag, I think my other dog Jazz must have been cheering her on.


Pin It
 

 Any way I will enter this pocket watch in to the following competitions.

Country View Crafts October competition Something Spooky here's the link http://countryviewchallenges.blogspot.co.uk/2013/10/its-october-and-its.html

Waltzingmouse stamps, Victorian Ghost Stories.
PAJAMA-PARTY-LOGOhttp://waltzingmouse.blogspot.co.uk/2013/10/wms-october-pajama-party.html


Wednesday 11 September 2013

Steam Punk floral compass

 
Hello, today I thought to show my Steam Punk floral compass, Its taken awhile as I do it in small steps. Any way here's some pictures I hope you like what you see.


Tools and Materials used.
 
 
Die cutting machine. Jus-Cutz.
Life style craft circle dies.
All occasion dies-cogs set, and various other cog dies.
Spellbinders crosses die set.
Sizzix pocket watch die, circles dies, Movers and Shapers Labels die, Bigz Daisy die.
Truecut roller cutter and ruler.
Crocodile hole punch.
Tim Holtz, long fasteners, buckles, distressed paint, Seedless Preserves, Black Soot. Distressed inks. Stampers Anonymous Time Traveller's stamp set.
Gunge board.
Pearlised card, various colours.
Clarity satin card.
Various gems.
Pro marker pens.
Glue.
Vegetable tanned leather.
Compass stamp {one of my own}.size diameter 4 inches.
Eyelets  large and small.
Small piece of clear plastic.
 
 
Basic method of building the pocket watch is covered in Pocket watch number three. Look in July. The main difference in this Steam Punk compass was to create greater depth this was done by the use of grunge board instead of grunge paper, which is roughly twice as thick. You can see the difference this makes in the photo above as both are shown side by side.
 
 
The hinge and buckle tie are cut out of vegetable tanned leather using the Sizzix dies movers and shapers labels with their magnetic base tray and the Truecut wheel cutter with ruler. Both the hinge and the tie were both run through through my die cutting machine using the Spellbinders largest cross die. As the leather is so thick the die will just cut and emboss the smooth surface which can then be coloured with pro markers or other alcohol ink pens. 


Next I glued together five completed circle layers and punched holes to add both hinge and buckle (I use a Crocodile hole punch).As you see below.


I cut out a small piece of the fourth circle to accommodate the hinge.


Once the hinge, buckle and strap were fixed in place with long fasteners, the rest of the layers were stuck together.


Next to decorate the inside, here I used Tim Holtz Time Traveller's stamps with various cogs and gems.


Here I made a small tube of card which I then glued and painted so that I could add a spinner for my compass. Using the tiny centre circle of the compass stamp I added a small eyelet then a larger eyelet so one sat inside the other I then attached the spinner first to a fastener and then through the eyelets. It was done this way so the spinner could move when glued to the top.


Next I cut the four layers of my compass stamp and coloured them with pro markers and distressed inks. The layers were then glued in place and the spinner attached.


Here are two pictures of the finished compass inside and out.


Pin It
 
I hope you like what you see I will be entering into the following:-

Country View crafts Challenge 7 for September :- LAYERS Heres the link.